
So here I'm starting my next level from scratch so I can easily document and share how my thought process on level designing works. This first part is where I like to start from and I'm sure most professional level designers will say the same:
White-Boxing, designing a general level layout that will define the general boundaries and different sections of your level. I consider it important to white-box a level before adding any textures or details so you get a better idea of scale, not only for the character presence in the level but also for any battles, and where the player will be facing when enemies appear, it will help you have a general idea of the size of the encounter and also how you will pace battles with other level elements, such as puzzle, exploration, etc..
This is a pretty simple level, with a few rooms, in which I will try to present some of the elements in a level, both from a game design standpoint and from a good practice in level design.
In Room 1, I will try to quickly make sure the player knows the basic controls before he can proceed, I will be presenting on screen some basic commands like movement, shooting and switching weapon mode to the "gravity gun" that they will need to use to move forward. The objective of this room is to make sure the player knows enough to finish the level.
After a small corridor, the player will reach the big room number 2. This room will be rich with objects and obstacles. I will also add here some enemies for the player to experience combat. Since this will be the first battle the player will ever experience, I will make sure the enemies are weak and can be killed rather quickly. One thing that will also be important in this room is the player facing. When he enters the level, we will make sure to show them that they are facing their next objective by putting the enemy between him and room number 3. The objective of this room is to show the player who the enemy is and give him a sense of being in a large place with multiple floors. Finally, we will also show him the general level objective: The big doors to Room 6.
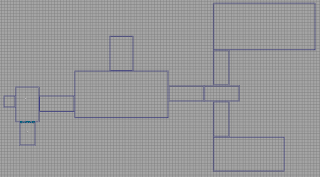
At room number 3, we will add a sequence that makes him go to rooms 4 and 5 to complete secondary objectives and face more enemies before he can continue on his main objective, which will be to go to room 6. The objective of these rooms is to show the player that something else must be done to complete the main objective, and add secondary objectives to be complete before that one, giving the level a new layer of engagement and diminishing the sense of linearity.
Room 6 will be the level exit. It will have big doors and will be well lit so players note it even though it's not their primary concern when they enter the level. As soon as they complete objectives in room 5 and 6, they will know their only way out will be the unexplored doors. The objective of this room is to finish the level.
The White-Boxing gave me a pretty good idea of how the level will work out and I can almost play it in my head already in a simple flow. Since this process is pretty fast, you can try out some different combinations, and also get some feedback from other people that could be involved later. For example an artist could suggest some specific assets or a general mood for a specific part of your level just as you present him the white-box and tell him how you imagine it would work out. Your peers will always be key to a well done game. I, for instance, like them to criticize my work early!
That's it for this first part. On the next one we will start to narrow down the boundaries of the levels to have an even better sense of space inside it. Later!
No comments:
Post a Comment